블로그 메인 페이지 변경하기
intro
jomoo.dev의 리팩터링을 일단락했으니 이번에는 새로운 메인 페이지를 만들려고 한다.
현재 programmers, algorithms, vocabularynote의 글들만 메인 화면에서 보여주고 있다.
이보다는 최근 작성한 글 순서대로 보여주는 것이 좋을 거 같다.
새로운 메인 페이지에서 보여줄 작성한 글
새로운 메인 페이지에서 보여줄 글들은 category, detail과 관계없이 최근 작성한 순서대로 보여주려 한다.
하지만, 날짜순으로 글들을 보여주면 어떤 category, detail 글인지 한눈에 알기 어렵다.
따라서 해당 정보를 태그 버튼 형식으로 정보를 알리려 한다.
이전 jomoo.dev 리팩터링 - 4, 컴포넌트 디렉터리에서 컴포넌트들을 리팩터링했었다. 바로 다음 글에서 또 변경하려니 slot을 이용해 재사용성을 늘려주는 게 맞았나 싶었다. 하지만 새롭게 추가하려는 태그 버튼은 이전에 예상하지 못했던 부분이었기에, 추가하려는 기능에 대한 새로운 영역이 필요한 경우 slot 영역을 추가하는 게 맞는 거 같다.
추가하려는 category와 detail 태그 버튼은 작성한 글이 어떤 category, detail 인지를 나타내며, 클릭하면 해당 category 또는 해당 detail index 페이지로 이동하는 기능을 갖게 하려 한다.
현재 category의 index 페이지는 없다. 따라서, category의 detail 항목들에 대한 설명과 클릭하면 클릭한 detail의 index 페이지로 이동하는 카드들을 담은 category index 페이지도 추가하겠다.
.md 파일의 머리말에 category, detail 키 추가
추가할 태그 버튼은 클릭하면 클릭한 category 또는 detail의 index 페이지로 이동해야 한다. 원하는 경로를 얻는 방법은 여러 가지 있지만, 작성한 글인 .md 파일 머리말에 category와 detail의 key:value를 추가해, 조합하는 것이 가장 간단한 방식인 거 같다.
---
title: 글 제목
...
category: projects
detail: jomoodev
---
PostCard.vue에 tags slot 추가
<script setup>
const props = defineProps({
  path: {
    type: String,
    required: true,
  },

  title: {
    type: String,
    required: true,
  },

  description: {
    type: String,
    required: true,
  },

  date: {
    type: String,
    required: true,
  },
});
</script>

<template>
  <div class="flex flex-col py-3">
    <div class="flex flex-1">
      <NuxtLink :to="props.path">
        <div class="text-2xl font-bold truncate pb-3">
          {{ props.title }}
        </div>
        <div class="text-zinc-500 text-base leading-5">
          {{ props.description }}
        </div>
      </NuxtLink>
    </div>
    <div class="font-semibold text-sm">
      <slot name="tags" />
    </div>
    <div class="flex text-sm text-zinc-400">
      {{ props.date }}
    </div>
  </div>
</template>
tags slot 추가와 몇 가지 변경한 후의 PostCard.vue 컴포넌트<slot name="tags" />을 통해 해당 영역의 사용을 자유롭게 선택하여, 메인 페이지에서는 해당 영역을 사용하고 category detail index 페이지에서는 사용하지 않게 했다.
이전 PostCard.vue에서는 prop.size를 이용해 css class 값을 동적으로 결정했었다. 변경 후에는 css class를 통일시켰다. 작은 사이즈의 PostCard를 사용하지 않기 때문이다.
또 다른 변경 점으로, <NuxtLink>의 사용이다. 이전에는 div 태그에 클릭 이벤트로 navigateTo를 호출해 라우팅했었다.
이번에 semantic tag에 대해 살짝 알게 됐는데, div 태그에서의 click 이벤트는 현재 경로에서 특정 이벤트를 실행시킬 때 사용하고, a 태그는 경로를 이동할 때 사용하는 것이 의미상으로 적합하다고 한다. 따라서 a 태그를 대체하는 nuxt의 <NuxtLink>로 변경했다.
category index 페이지
이번에 추가한, 기본 레이아웃에서 note, projects를 클릭하거나 메인 페이지에서 category 태그 버튼을 클릭 시 이동할 페이지
composables/useCategory.js
const categoriesMap = {
  note: {
    description: '학습한 내용들을 기록하는 장소입니다.',
    itmes: [
      {
        detail: 'programmers',
        text: '프로그래머스',
        description: '프로그래머스 코딩 테스트 연습',
        path: '/note/programmers',
        iconName: 'ProgrammersIcon',
      },
      {
        detail: 'algorithms',
        text: '알고리즘',
        description: '학습한 알고리즘 정리',
        path: '/note/algorithms',
        iconName: 'mynaui:math-square',
      },
      {
        detail: 'wootecos',
        text: '우테코',
        description: '우테코 프리코스',
        path: '/note/wootecos',
        iconName: 'devicon-plain:woocommerce',
      },
      {
        detail: 'js',
        text: '자바스크립트',
        description: '학습한 자바스크립트 정리',
        path: '/note/js',
        iconName: 'fa6-brands:square-js',
      },
    ],
  },

  projects: {
    description: '진행한 토이 프로젝트를 기술하는 장소입니다.',
    itmes: [
      {
        detail: 'vocabularynote',
        text: 'vocabulary',
        description: 'vue3로 만든 토이 프로젝트 영어 단어장',
        path: '/projects/vocabularynote',
        iconName: 'healthicons:i-note-action-outline',
      },
      {
        detail: 'jomoodev',
        text: 'jomoo.dev',
        description: `nuxt3와 nuxt-content로 만든 블로그`,
        path: '/projects/jomoodev',
        iconName: 'material-symbols-light:logo-dev-rounded',
      },
    ],
  },
};

export function useCategory() {
  const category = ref('');
  const categoryDescription = ref('');
  const categoryItems = ref([]);
  const route = useRoute();

  category.value = route.params.category;
  categoryDescription.value = categoriesMap[category.value].description;
  categoryItems.value = categoriesMap[category.value].itmes;

  return { category, categoryDescription, categoryItems };
}
pages/[category]/index.vue
<script setup>
const { category, categoryDescription, categoryItems } = useCategory();

useHead({
  title: category,
  meta: [{ name: 'description', content: `${category}의 detail 항목들` }],
});
</script>

<template>
  <NuxtLayout name="side-bar">
    <div class="flex flex-col gap-y-5 py-3">
      <div class="flex flex-col gap-y-1.5">
        <h1 class="text-xl font-bold capitalize">{{ category }}</h1>
        <p class="text-slate-500/80 text-sm md:text-base font-medium">
          {{ categoryDescription }}
        </p>
      </div>
      <div class="grid sm:grid-cols-2 gap-x-2 gap-y-8 xl:grid-cols-3">
        <div
          v-for="{ text, path, description, iconName } in categoryItems"
          :key="text"
          class="sm:max-w-72 md:w-80 h-44 lg:min-w-80 xl:w-72 xl:min-w-72"
        >
          <CategoryDetailCard
            :detail-text="text"
            :path="path"
            :description="description"
            :icon-name="iconName"
          />
        </div>
      </div>
    </div>
  </NuxtLayout>
</template>
컴포저블 함수 useCategory로 category와 categoryDescription, categoryItems를 얻어 현재 경로의 카테고리와 그에 대한 설명을 렌더링하며,
categoryItems를 CategoryDetailCard 컴포넌트에 전달해 카드 형태로 현재 경로의 category details 정보를 렌더링한다.
components/CategoryDetailCard.vue
<script setup>
defineProps({
  detailText: {
    type: String,
    default: 'category detail',
  },

  description: {
    type: String,
    default: 'category detail에 대한 설명',
  },

  iconName: {
    type: String,
    default: 'ion:accessibility',
  },

  path: {
    type: String,
    default: '/',
  },
});
</script>

<template>
  <NuxtLink :to="path">
    <div
      class="ring-1 ring-slate-300 hover:ring-emerald-500 hover:ring-2 rounded-xl w-full h-full py-3 px-4"
    >
      <div class="w-full h-20 flex items-center">
        <Icon :name="iconName" size="55" />
      </div>
      <div class="flex flex-col">
        <h3 class="text-lg py-1 font-medium truncate text-slate-800">{{ detailText }}</h3>
        <p class="text-[14px] leading-4 text-slate-700/80 text-ellipsis overflow-hidden capitalize">
          {{ description }}
        </p>
      </div>
    </div>
  </NuxtLink>
</template>
Category index 페이지에서 사용하는 카드 컴포넌트
Category detail의 detailText, description, iconName, path를 prop 데이터로 받아 화면에 렌더링한다.
클릭하는 경우 해당 detail의 index 페이지로 이동한다.
새로운 메인 페이지 pages/index.vue
<script setup>
const h1Text1 = '안녕하세요! 이곳은 개발자의 성장 이야기와 코드의 흔적을 기록하는 곳입니다.';
const h1Text2 = '모듈을 활용하여 만들어진 이 블로그는 지식의 나눔을 추구합니다.';
const pText = `주요 주제로 코딩 테스트, 알고리즘, 자바스크립트 학습 내용과 진행했던 토이 프로젝트 관련 내용을 다룹니다!`;

const { data: recentWritePosts } = await useAsyncData(
  'recentWritePosts',
  () => {
    return queryContent('/')
      .sort({ date: -1 })
      .limit(5)
      .only(['_path', 'title', 'description', 'date', 'category', 'detail'])
      .find();
  },
  {
    transform(recentWritePosts) {
      return recentWritePosts.map((post) => {
        const tags = [
          { text: post.category, path: post.category },
          { text: post.detail, path: `${post.category}/${post.detail}` },
        ];
        return { ...post, tags };
      });
    },
  },
);

useHead({
  title: 'jomoo.dev',
  meta: [
    {
      name: 'description',
      content: pText,
    },
  ],
});
</script>

<template>
  <div class="flex flex-col gap-y-20">
    <section
      class="h-[calc(100vh-430px)] flex justify-center items-center flex-col gap-y-1 break-keep capitalize"
    >
      <h1 class="text-xl font-semibold text-center text-slate-700">
        {{ h1Text1 }}
        <br />
        <NuxtLink to="https://nuxt.com/" target="_blank">
          <span class="text-emerald-500">nuxt</span></NuxtLink
        >와
        <NuxtLink to="https://content.nuxt.com/" target="_blank"
          ><span class="text-emerald-500">nuxt-content</span></NuxtLink
        >
        {{ h1Text2 }}
      </h1>
      <p class="text-base text-gray-500 font-medium">
        {{ pText }}
      </p>
    </section>
    <section class="lg:mx-24">
      <div class="flex flex-col gap-y-3 md:gap-y-4 py-4">
        <h2 class="text-2xl md:text-3xl text-zinc-700 font-extrabold">최신 글</h2>
        <div class="flex flex-col gap-y-2">
          <PostCard
            v-for="{ _path, title, description, date, tags } in recentWritePosts"
            :key="title"
            :date="date"
            :title="title"
            :path="_path"
            :description="description"
            class="min-h-[174px] max-h-[174px]"
          >
            <template #tags>
              <div class="flex gap-x-2 relative bottom-3">
                <NuxtLink v-for="{ path, text } in tags" :key="text" :to="path">
                  <div
                    class="flex bg-slate-200/60 rounded-xl px-[9px] py-[3px] hover:bg-gray-100 text-emerald-600/90 hover:text-emerald-700/90"
                  >
                    {{ text }}
                  </div>
                </NuxtLink>
              </div>
            </template>
          </PostCard>
        </div>
      </div>
    </section>
  </div>
</template>
이것저것 변경된 새로운 메인 페이지useAsyncData의 queryContent에서 sort({ date: -1 }), limit(5)을 추가해 가장 최근에 작성한 글 5개를 순서대로 보여주며, transform에서 태그 버튼에 전달할 값들을 tags 필드로 추가했다.
또한, 메인 페이지의 맨 위에 블로그에 대한 간단한 소개문을 넣었다. 간단해도 적당한 말이 생각나지 않아 참 어려웠다...
위에서 추가한 PostCard.vue 컴포넌트의 <slot>에 <template #tags>로 태그 버튼들을 넣었다.
구조 다이어그램
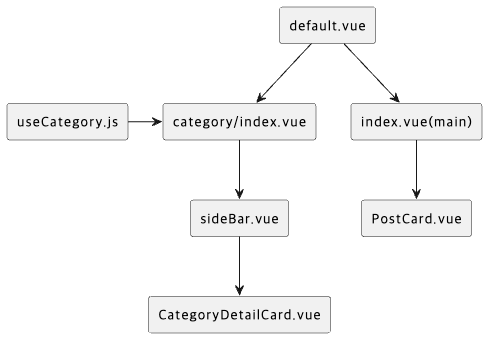
이번에 다뤘던 파일(컴포넌트, 페이지, 컴포저블)들에 대한 구조 다이어그램
기본 레이아웃 default.vue를 상단으로 시작해 페이지 category/index.vue, 메인 페이지 index.vue(main)가 있다.
category/index.vue 페이지는 컴포저블 함수 useCategory.js를 이용해 현재 경로에 따른 category 정보를 얻어 페이지에서 현재 category를 알리며, CategoryDetailCard.vue 컴포넌트에 필요한 정보 전달해 현재 category detail 관련 정보를 렌더링한다.
메인 페이지 index.vue(main)는 작성한 글들을 PostCard.vue를 이용해 렌더링한다.
새로운 문제
새로운 문제가 발생했다. 화면 넓이가 md(768px)보다 작을 때 카테고리들을 보여주는 CategoriesMenu.vue 컴포넌트가 정상적으로 동작하지 않는다.CategoriesMenu.vue 컴포넌트의 카테고리를 클릭하면 클릭한 카테고리 페이지로 이동하고 CategoriesMenu.vue가 화면에서 제거되어야 한다.
이동은 하지만 CategoriesMenu.vue가 제거되지 않는다.
문제의 원인
이 문제의 원인은 CategoriesMenu.vue의 카테고리 클릭 시 이동하는 페이지가 달라졌기 때문이다.
이전에는 category/index 페이지가 없었고, 특정 category/detail/index 페이지로 이동했었다.
refactor-pages에서 다뤘던 새로운 문제
위의 글에서 발생했었던 문제를 해결하기 위해 [category]/[detail]/index.vue의 onMounted훅에서 CategoriesMenu.vue를 제거했었다.
<script setup>
// default.vue에서 CategoriesMenu를 제거하는 함수 closeCategoriesMenu를 주입받고
// onMounted 훅에서 실행하여 CategoriesMenu를 제거하는 코드
...
const closeCategoriesMenu = inject('closeCategoriesMenu');

onMounted(() => closeCategoriesMenu());
...
</script>
변경 후에는 category/detail/index 페이지로 이동하지 않고 category/index 페이지로 이동하기에
CategoriesMenu.vue를 제거하는 로직이 실행되지 않는다.
문제 해결
간단하게 위의 [category]/[detail]/index.vue의 CategoriesMenu 컴포넌트 제거 로직을 [category]/index.vue로 이동시키면 된다.
추가로
컴포저블 함수 useCategory에서의 반환 값 중 하나인 categoryItems은 레이아웃 sideBar.vue에서 import 하는 상수 파일을 대체할 수 있어
sideBar.vue에서 useCategory를 이용하도록 변경했다.
변경 전
<script setup>
import { CATEGORIES_DETAILS } from '~/constants/categoriesDetail';

const route = useRoute();
const { category, detail } = route.params;

const categoryDetailItems = CATEGORIES_DETAILS[category].map((categoryDetail) => {
  const active = categoryDetail.detail === detail;
  return { ...categoryDetail, active };
});
</script>

<template>
  <!-- 생략 -->
        <nav>
          <ul class="font-bold flex gap-x-4 md:block">
            <li v-for="{ path, text, active } in categoryDetailItems" :key="path">
              <NuxtLink :to="path">
                <div
                  class="hover:text-emerald-500 py-1.5"
                  :class="active ? 'text-emerald-600' : 'text-black'"
                >
                  {{ text }}
                </div>
              </NuxtLink>
            </li>
          </ul>
        </nav>
  <!-- 생략 -->
</template>
변경 후
<script setup>
const route = useRoute();
const currentDetail = route.params.detail;

const { categoryItems } = useCategory();
</script>

<template>
  <!-- 생략 -->
        <nav>
          <ul class="font-bold flex gap-x-4 md:block text-sm md:text-base">
            <li v-for="{ path, text, detail } in categoryItems" :key="path">
              <NuxtLink :to="path">
                <div
                  class="hover:text-emerald-500 py-1.5"
                  :class="currentDetail === detail ? 'text-emerald-600' : 'text-black'"
                >
                  {{ text }}
                </div>
              </NuxtLink>
            </li>
          </ul>
        </nav>
  <!-- 생략 -->
</template>
또, 객체에 active 속성을 추가하는 것보다 현재 경로의 detail과 일치하면 text의 색깔을 변경하도록 했다.
코드를 다시 보니 굳이 배열을 순환하여 active 속성을 추가하는 것은 비효율적이라고 생각했다.
constants 디렉터리에 대해
지금까지 constants 디렉터리에서 상수들을 관리했었다. 물론 이 방식은 올바른 방식이다.
하지만 nuxt에서는 app.config.js를 이용해 전역으로 값을 관리할 수 있으며, composables 디렉터리에서 상숫값과 관련 로직을 함께 관리하는 게 더 좋다는 생각이 들었다.
nuxt를 다뤄보니 composables 디렉터리에서 상수와 관련 로직을 한 번에 같이 관리하는 것이 상숫값이 어떻게 다뤄질지 예상하기 훨씬 쉬웠고,
나중에 코드를 다시 봐도 금방 이해할 수 있어 좋았다.
반면에 constants 디렉터리에서 상수를 관리할 때는 어디서 어떻게 다뤄질지 찾아봐야 하는 번거로움이 있어 불편했다.
앞으로는 constants 디렉터리 사용을 지양하고, 테마 같은 전역 설정이 필요한 경우 app.config.js를 이용하여 관리하고, 상수와 그 상수를 다루는 로직이 필요한 경우에는 composables 디렉터리에서 같이 다루도록 하려 한다.
마무리
해당 블로그의 메인 페이지를 새롭게 변경했다.
메인 페이지에서의 블로그에 대한 설명을 느낌 있게 하고 싶었지만, 현재 내 능력으로는 더 이상은 어려울 거 같다...
이전에 고정된 카테고리 디테일 항목들의 글들을 보여주는 것보다, 작성한 최신 날짜 순서대로 글을 보여주는 것이 훨씬 보기 좋은 거 같다. 이건 잘 변경했다.
다음에는 constants 디렉터리 제거와 댓글 기능을 추가하려고 한다.